体渲染绘制地球
之前看到有人问体渲染绘制地球的颜色渲染不对。难道还有构建体素数据来渲染地球这种玩法吗?果断试一下:
- 1 找地球图片数据
- 2 贴图实现地球的可视化(TexturedSphereSource)
- 3 构建一个球形体素数据并用体渲染可视化
- 4 构建地球的体渲染数据
1 项目地址
参考:
* Purdue CS 一个很老的教案 https://www.cs.purdue.edu/homes/xmt/classes/CS530/Spring2013/CS530_Projects/Project_1.html
在官方案例基础上改的
- 隐函数的案例 https://kitware.github.io/vtk-examples/site/Cxx/VolumeRendering/SmartVolumeMapper/
- 纹理贴图案例 https://kitware.github.io/vtk-examples/site/Cxx/Texture/TexturedSphere/
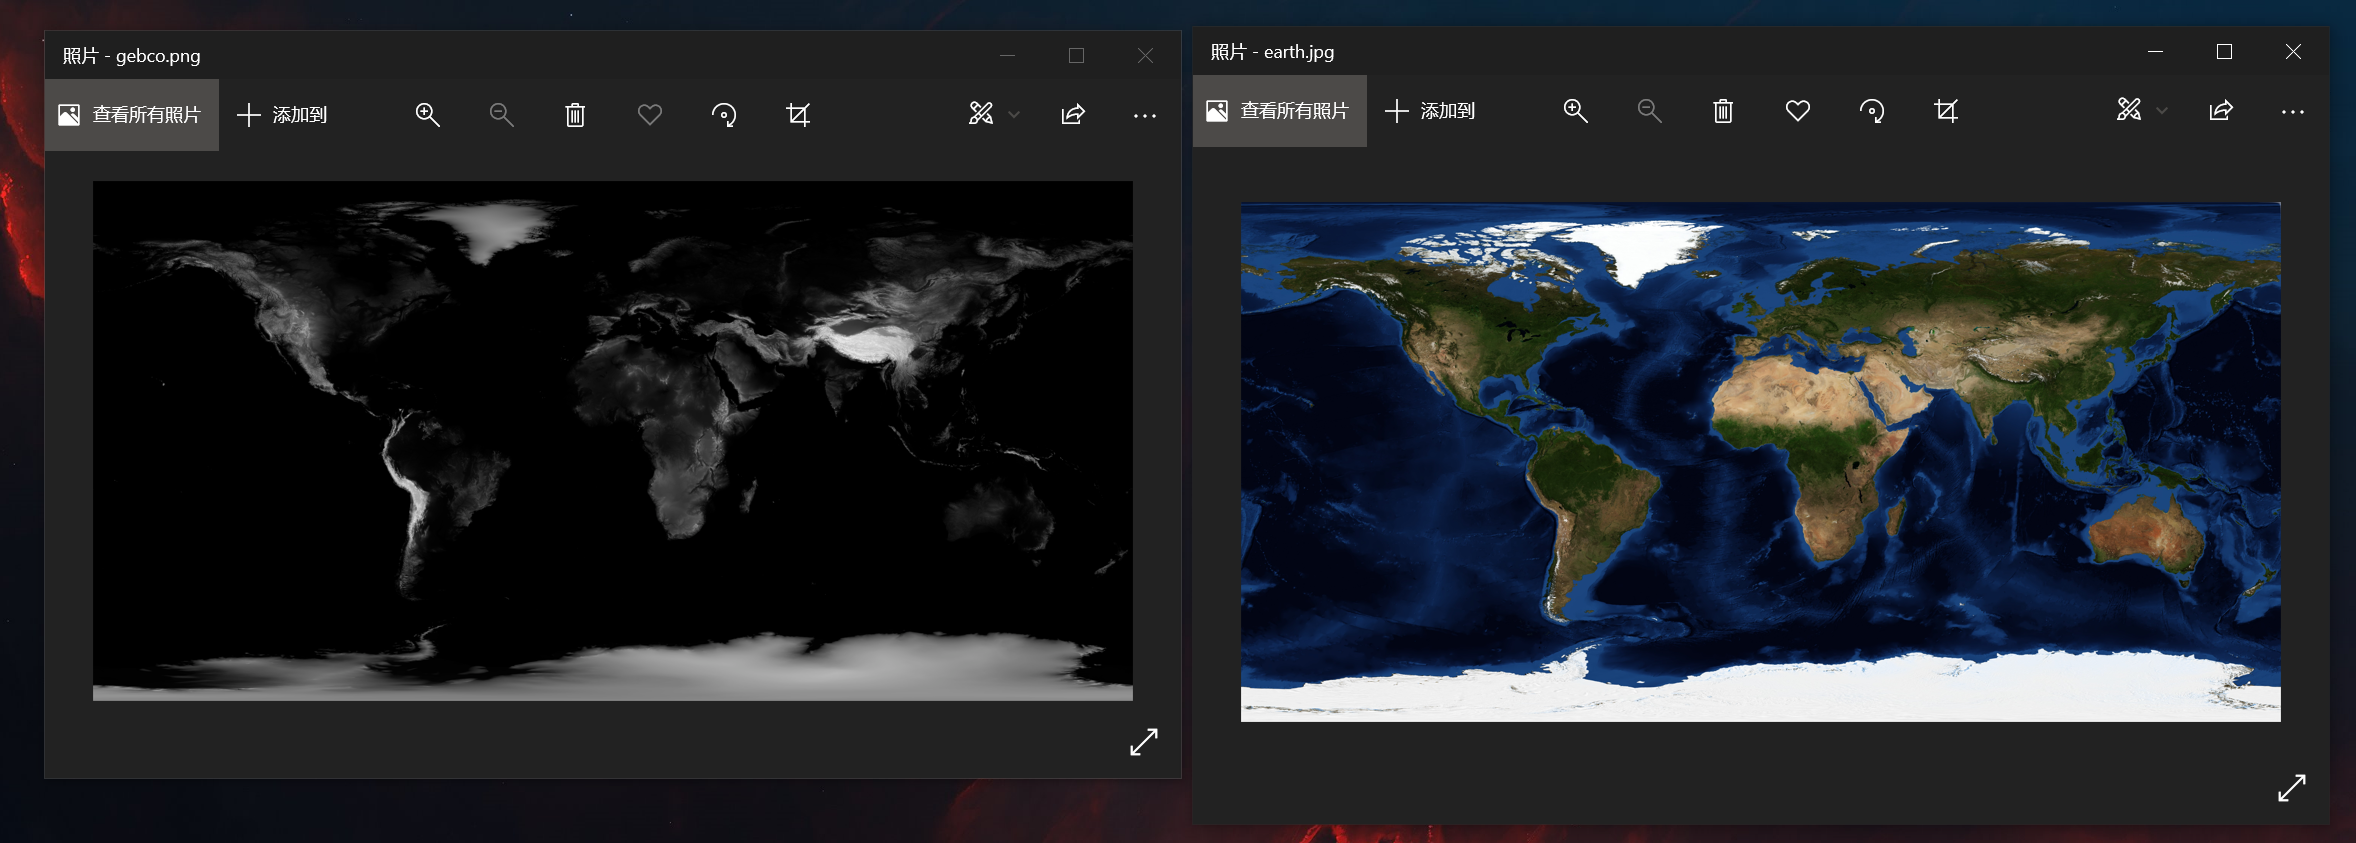
2 找地球图片数据
nasa.gov 提供了各种地球的图片,比如:
https://visibleearth.nasa.gov/images/73963/bathymetry
我选了两张:一个灰度图(构建体素数据),一个彩色的(纹理贴图用)
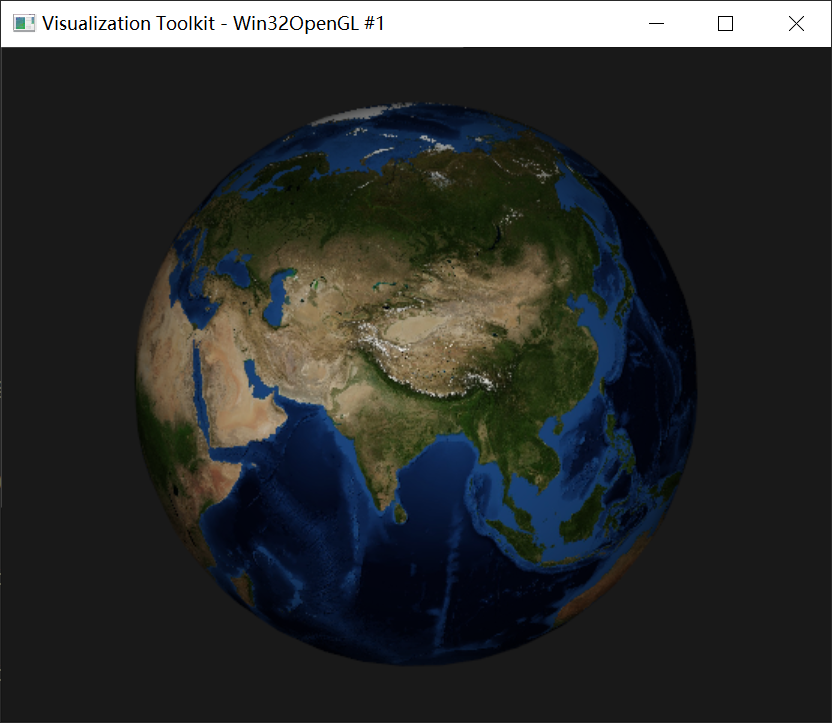
3 贴图实现地球的可视化(TexturedSphereSource)
直接利用 vtkTexturedSphereSource + vtkTransformTextureCoords 就可以快速的构建一个利用纹理贴图渲染的地球。
int main(int, char *[])
{

    vtkNew<vtkTexturedSphereSource> sphere;
    sphere->SetPhiResolution(32);
    sphere->SetRadius(10 * 6.371e6 / 6371 * 10e3);
    sphere->SetThetaResolution(32);
    vtkNew<vtkImageReader2Factory> reader_factory;
    vtkImageReader2 *image_reader = reader_factory->CreateImageReader2("./etc/earth.jpg");
    image_reader->SetFileName("./etc/earth.jpg");
    vtkNew<vtkTexture> texture;
    texture->SetInputConnection(image_reader->GetOutputPort());

    vtkNew<vtkTransformTextureCoords> transformTexture;
    transformTexture->SetInputConnection(sphere->GetOutputPort());
    transformTexture->SetPosition(0, 0, 0);
    vtkNew<vtkPolyDataMapper> mapper;
    mapper->SetInputConnection(transformTexture->GetOutputPort());

    vtkNew<vtkActor> actor;
    actor->SetMapper(mapper);
    actor->SetTexture(texture);

    vtkNew<vtkRenderer> renderer;
    vtkNew<vtkRenderWindow> render_window;
    render_window->AddRenderer(renderer);

    vtkNew<vtkRenderWindowInteractor> renderWindowInteractor;
    renderWindowInteractor->SetRenderWindow(render_window);

    renderer->AddActor(actor);
    renderer->SetBackground(0.1, 0.1, 0.1);

    render_window->Render();
    renderWindowInteractor->Start();

    return EXIT_SUCCESS;
}
4 构建一个球形体素数据并用体渲染可视化
没有试过直接构建一组三维影像数据,设置像素进行体渲染。先验证下可行性。这是效果
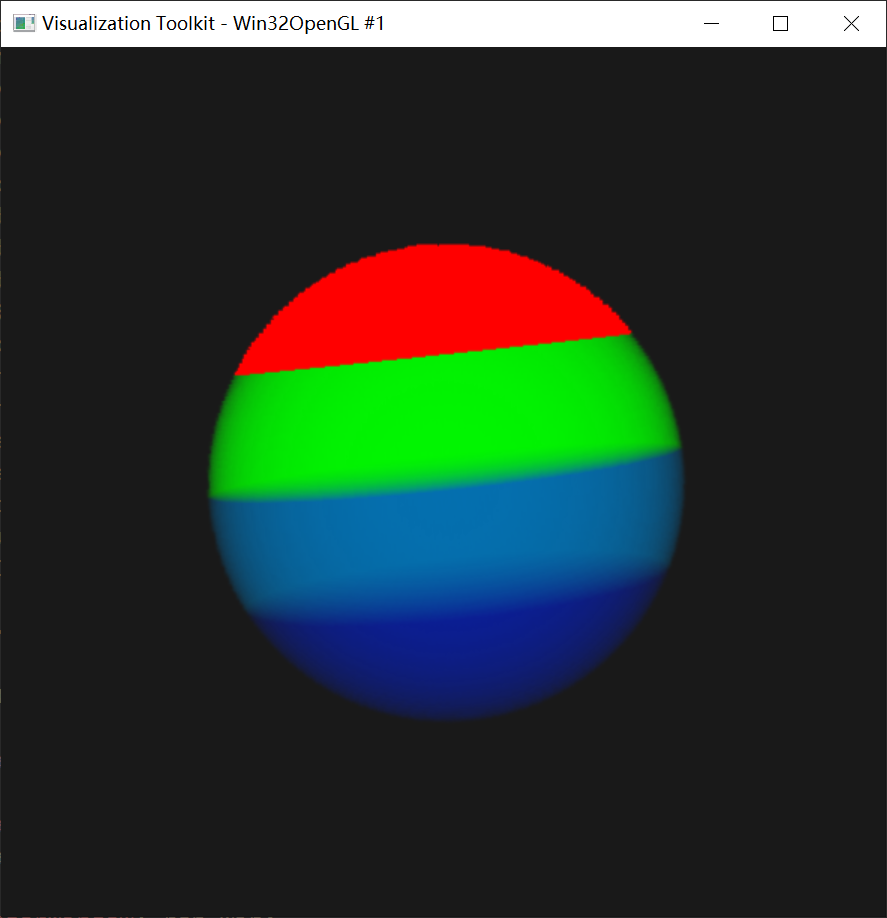
vtk提供了大量的隐函数来构建图片,我选择用 vtkSphere + vtkSampleFunction 构建一个 127 x 127 x 127 的三维图像;
void CreateImageData(vtkImageData *imageData)
{
    vtkNew<vtkSphere> sphere;
    sphere->SetRadius(0.1);
    sphere->SetCenter(0.0, 0.0, 0.0);
    vtkNew<vtkSampleFunction> sampleFunction;
    sampleFunction->SetImplicitFunction(sphere);
    sampleFunction->SetOutputScalarTypeToDouble();
    sampleFunction->SetSampleDimensions(127, 127, 127);
    sampleFunction->SetModelBounds(-1.0, 1.0, -1.0, 1.0, -1.0, 1.0);
    sampleFunction->SetScalarArrayName("values");
    sampleFunction->Update();
    vtkDataArray *a = sampleFunction->GetOutput()->GetPointData()->GetScalars("values");
    double range[2];
    a->GetRange(range);
    vtkNew<vtkImageShiftScale> t;
    t->SetInputConnection(sampleFunction->GetOutputPort());
    t->SetShift(-range[0]);
    double magnitude = range[1] - range[0];
    t->SetScale(255.0 / magnitude);
    t->SetOutputScalarTypeToUnsignedChar();
    t->Update();

    imageData->ShallowCopy(t->GetOutput());
    int dimension[3];
    imageData->GetDimensions(dimension);
    for (int k = 0; k < dimension[2]; k++) {
        for (int x = 0; x < dimension[0]; x++) {
            for (int y = 0; y < dimension[1]; y++) {
                unsigned char *pixel = static_cast<unsigned char *>(imageData->GetScalarPointer(x, y, k));
                if (pixel[0] < 80) {
                    if (k >= 0 && k < 30) {
                        pixel[0] = 40;
                    } else if (k >= 30 && k < 60) {
                        pixel[0] = 43;
                    } else if (k >= 60 && k < 90) {
                        pixel[0] = 46;
                    } else if (k >= 90) {
                        pixel[0] = 49;
                    }
                } else {
                    pixel[0] = 255;
                }
            }
        }
    }

    std::string folder_path = "./out";
    system("rd /s/q out");
    _mkdir(folder_path.c_str());
    vtkNew<vtkImageCast> cast_filter;
    cast_filter->SetOutputScalarTypeToUnsignedChar();
    cast_filter->SetInputData(imageData);
    vtkNew<vtkPNGWriter> writer;
    writer->SetFilePattern("./out/%d.png");
    writer->SetFileDimensionality(3);
    writer->SetInputConnection(cast_filter->GetOutputPort());
    writer->Write();
}
体渲染参数 vtkSmartVolumeMapper
    vtkNew<vtkVolumeProperty> volume_property;

    vtkNew<vtkPiecewiseFunction> composite_opacity;
    composite_opacity->AddPoint(0.0, 0.0);
    composite_opacity->AddPoint(40.0, 1.0);
    composite_opacity->AddPoint(55, 0.0);
    composite_opacity->AddPoint(255.0, 0.0);
    volume_property->SetScalarOpacity(composite_opacity);

    vtkNew<vtkColorTransferFunction> color;
    color->AddRGBPoint(0.0, 0.0, 0.0, 0.0);
    color->AddRGBPoint(40.0, 1.0, 0.0, 0.0);
    color->AddRGBPoint(43.0, 0.0, 1.0, 0.0);
    color->AddRGBPoint(46.0, 0.0, 0.5, 0.8);
    color->AddRGBPoint(50.0, 0.0, 0.0, 1.0);
    color->AddRGBPoint(255.0, 0.0, 0.0, 1.0);
    volume_property->SetColor(color);
完整代码
void CreateImageData(vtkImageData *im);

int main(int, char *[])
{
    vtkNew<vtkImageData> image_data;
    CreateImageData(image_data);

    vtkNew<vtkRenderWindow> ren_win;
    vtkNew<vtkRenderer> render;
    render->SetBackground(0.1, 0.1, 0.1);
    ren_win->AddRenderer(render);
    ren_win->SetSize(301, 300);

    vtkNew<vtkRenderWindowInteractor> iren;
    iren->SetRenderWindow(ren_win);
    ren_win->Render();

    vtkNew<vtkSmartVolumeMapper> volume_mapper;
    volume_mapper->SetBlendModeToComposite();
    volume_mapper->SetInputData(image_data);

    vtkNew<vtkVolumeProperty> volume_property;

    vtkNew<vtkPiecewiseFunction> composite_opacity;
    composite_opacity->AddPoint(0.0, 0.0);
    composite_opacity->AddPoint(40.0, 1.0);
    composite_opacity->AddPoint(55, 0.0);
    composite_opacity->AddPoint(255.0, 0.0);
    volume_property->SetScalarOpacity(composite_opacity);

    vtkNew<vtkColorTransferFunction> color;
    color->AddRGBPoint(0.0, 0.0, 0.0, 0.0);
    color->AddRGBPoint(40.0, 1.0, 0.0, 0.0);
    color->AddRGBPoint(43.0, 0.0, 1.0, 0.0);
    color->AddRGBPoint(46.0, 0.0, 0.5, 0.8);
    color->AddRGBPoint(50.0, 0.0, 0.0, 1.0);
    color->AddRGBPoint(255.0, 0.0, 0.0, 1.0);
    volume_property->SetColor(color);

    vtkNew<vtkVolume> volume;
    volume->SetMapper(volume_mapper);
    volume->SetProperty(volume_property);
    render->AddViewProp(volume);
    render->ResetCamera();

    ren_win->Render();
    volume_mapper->SetRequestedRenderModeToRayCast();
    ren_win->Render();
    iren->Start();

    return EXIT_SUCCESS;
}

void CreateImageData(vtkImageData *imageData)
{
    vtkNew<vtkSphere> sphere;
    sphere->SetRadius(0.1);
    sphere->SetCenter(0.0, 0.0, 0.0);
    vtkNew<vtkSampleFunction> sampleFunction;
    sampleFunction->SetImplicitFunction(sphere);
    sampleFunction->SetOutputScalarTypeToDouble();
    sampleFunction->SetSampleDimensions(127, 127, 127);
    sampleFunction->SetModelBounds(-1.0, 1.0, -1.0, 1.0, -1.0, 1.0);
    sampleFunction->SetScalarArrayName("values");
    sampleFunction->Update();
    vtkDataArray *a = sampleFunction->GetOutput()->GetPointData()->GetScalars("values");
    double range[2];
    a->GetRange(range);
    vtkNew<vtkImageShiftScale> t;
    t->SetInputConnection(sampleFunction->GetOutputPort());
    t->SetShift(-range[0]);
    double magnitude = range[1] - range[0];
    t->SetScale(255.0 / magnitude);
    t->SetOutputScalarTypeToUnsignedChar();
    t->Update();

    imageData->ShallowCopy(t->GetOutput());
    int dimension[3];
    imageData->GetDimensions(dimension);
    for (int k = 0; k < dimension[2]; k++) {
        for (int x = 0; x < dimension[0]; x++) {
            for (int y = 0; y < dimension[1]; y++) {
                unsigned char *pixel = static_cast<unsigned char *>(imageData->GetScalarPointer(x, y, k));
                if (pixel[0] < 80) {
                    if (k >= 0 && k < 30) {
                        pixel[0] = 40;
                    } else if (k >= 30 && k < 60) {
                        pixel[0] = 43;
                    } else if (k >= 60 && k < 90) {
                        pixel[0] = 46;
                    } else if (k >= 90) {
                        pixel[0] = 49;
                    }
                } else {
                    pixel[0] = 255;
                }
            }
        }
    }

    std::string folder_path = "./out";
    system("rd /s/q out");
    _mkdir(folder_path.c_str());
    vtkNew<vtkImageCast> cast_filter;
    cast_filter->SetOutputScalarTypeToUnsignedChar();
    cast_filter->SetInputData(imageData);
    vtkNew<vtkPNGWriter> writer;
    writer->SetFilePattern("./out/%d.png");
    writer->SetFileDimensionality(3);
    writer->SetInputConnection(cast_filter->GetOutputPort());
    writer->Write();
}
5 构建地球的体渲染数据
上一步验证过体渲染绘制的可行性,接下来就是把隐函数改成地球数据,效果:
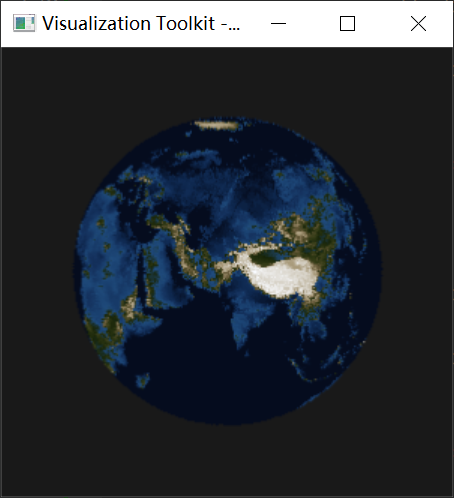
跟上一步除了隐函数完全一样,这里自定义一个隐函数实现类。
构建隐函数,有两个地方需要计算:
- 体素数据的像素,直接利用第一步下载好的地球数据即可。nasa提供的灰度图是归一化之后的,直接移位到需要的值即可(我选择是 500-2500)
- 球表面点映射到平面的坐标计算
double vtkEarthSphere::EvaluateFunction(double pos[3])
{
    const int x_dim = trexture_->GetDimensions()[0] - 1;
    const int y_dim = trexture_->GetDimensions()[1] - 1;

    double tc[2];
    double pixel = 0.0, phi = 0.0, thetaX = 0.0, thetaY = 0.0;
    const auto x = pos[0];
    const auto y = pos[1];
    const auto z = pos[2];
    const auto r = sqrt(x * x + y * y + z * z);
    if (abs(r - .8) < 0.02) {
        if (z > r) {
            phi = 0.0;
            if (z > 0.0) {
                tc[1] = 0.0;
            } else {
                tc[1] = 1.0;
            }
        } else {
            phi = acos(z / r);
            tc[1] = phi / vtkMath::Pi();
        }
        const auto rho = r * sin(phi);
        if (rho != 0.0) {
            if (abs(x) > rho) {
                if (x > 0.0) {
                    thetaX = 0.0;
                } else {
                    thetaX = vtkMath::Pi();
                }
            } else {
                thetaX = acos(x / rho);
            }
            if (abs(y) > rho) {
                if (y > 0.0) {
                    thetaY = vtkMath::Pi() / 2.0;
                } else {
                    thetaY = -vtkMath::Pi() / 2.0;
                }
            } else {
                thetaY = asin(y / rho);
            }
        } else {
            thetaX = thetaY = 0.0;
        }
        tc[0] = thetaX / (2.0 * vtkMath::Pi());
        if (thetaY < 0.0) {
            tc[0] = 1.0 - tc[0];
        }
        const auto trexture_x = static_cast<int>(tc[0] * x_dim);
        const auto trexture_y = y_dim - static_cast<int>(tc[1] * y_dim);
        unsigned char *gray_pixel = static_cast<unsigned char *>(
          trexture_->GetScalarPointer(trexture_x, trexture_y, 0));

        pixel = 550.0 + 2000.0 * (static_cast<double>(*gray_pixel) / 240.0);

    } else {
        pixel = -1000;
    }

    return pixel;
}
调整过隐函数,对应的体渲染参数也需要调整下
    vtkNew<vtkPiecewiseFunction> composite_opacity;
    composite_opacity->AddPoint(499, 0);
    composite_opacity->AddPoint(500.0, 1);
    composite_opacity->AddPoint(2500, 1);
    composite_opacity->AddPoint(2501, 0);
    volume_property->SetScalarOpacity(composite_opacity);

    vtkNew<vtkColorTransferFunction> color;
    color->AddRGBPoint(0.0, 0.0, 0.0, 0.0);
    color->AddRGBPoint(500.0, 2.0 / 255.0, 5.0 / 255.0, 20.0 / 255.0);
    color->AddRGBPoint(550.0, 5.0 / 255.0, 12.0 / 255.0, 30.0 / 255.0);
    color->AddRGBPoint(600.0, 13.0 / 255.0, 38.0 / 255.0, 76.0 / 255.0);
    color->AddRGBPoint(650.0, 20.0 / 255.0, 49.0 / 255.0, 93.0 / 255.0);
    color->AddRGBPoint(700.0, 25.0 / 255.0, 63.0 / 255.0, 110.0 / 255.0);
    color->AddRGBPoint(800.0, 31.0 / 255.0, 75.0 / 255.0, 124.0 / 255.0);
    color->AddRGBPoint(900.0, 23.0 / 255.0, 36.0 / 255.0, 8.0 / 255.0);
    color->AddRGBPoint(1000.0, 50.0 / 255.0, 58.0 / 255.0, 21.0 / 255.0);
    color->AddRGBPoint(1200.0, 99.0 / 255.0, 86.0 / 255.0, 54.0 / 255.0);
    color->AddRGBPoint(1400.0, 165.0 / 255.0, 150.0 / 255.0, 117.0 / 255.0);
    color->AddRGBPoint(2500.0, 249.0 / 255.0, 251.0 / 255.0, 255.0 / 255.0);
    volume_property->SetColor(color);